How to Hand Embroider: Beginner's Guide | Little Dear

Are you ready to start embroidering? Guess what? It's one of the easiest crafts to learn. With just a few tools and the quick lesson below, you'll be all ready to stitch up something fun.
You'll discover tons of unique hand embroidery designs in the little dear shop!
Whether you want to add a little embellishment to a shirt or pair of jeans, or you're planning to stitch an art piece to hang on your wall, you'll find hand embroidery fun, relaxing and very versatile.
Before you begin, you'll need to gather a few supplies. Chances are you already have some of them, but if not, you can find them easily at your local craft store.
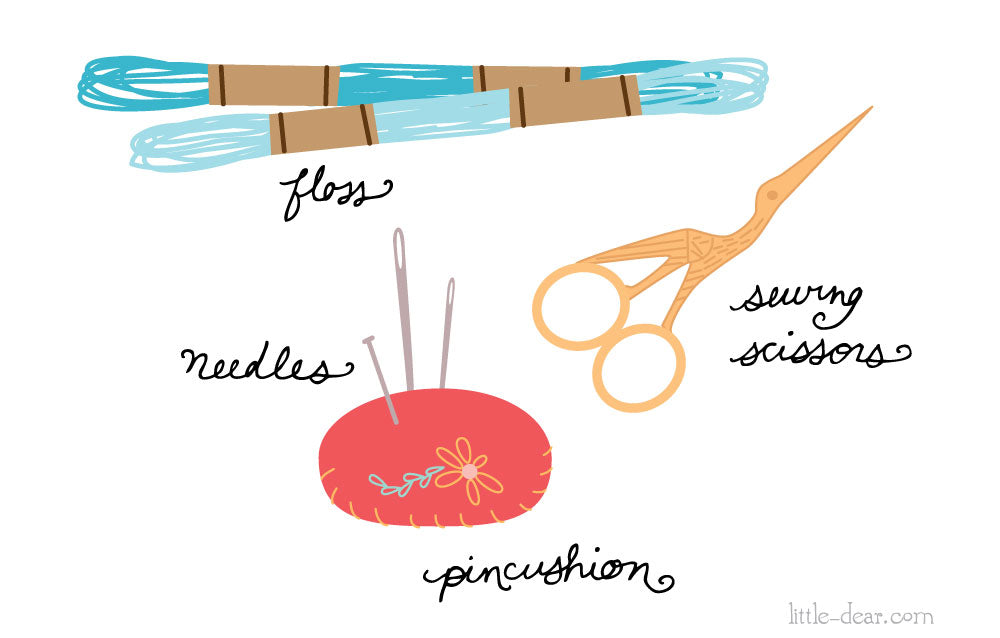
You will need:
- fabric, I most often use cotton/muslin or linen
- embroidery needle
- embroidery hoop
- floss
- scissors
I mostly use DMC brand embroidery floss that can be found in the big racks at most craft stores and comes in pretty much any color you can think of.
Embroidery needles also come in lots of sizes, (size 3 or 5 are my faves) a pack of various sizes is a good place to start. It's a good idea to have a small pincushion on hand as well, to hold your needles when you're not using them. (You can sew one from two pieces of felt with a little stuffing inside, decorate it with embroidery!)
You'll also want a pair of sharp scissors nearby as you stitch to snip threads with, and an embroidery hoop. A 6-inch hoop is a nice, basic size that can accommodate almost any embroidery project. Wooden and plastic hoops both work great.
(most of my hand embroidery patterns are designed to fit into 6 inch hoops!)

Before you begin, be sure your fabric is tightly secured on your hoop. You’ll see that there are two parts of the hoop, a top and a bottom piece that fit together. The metal screw at the top tightens the top hoop and holds your fabric in place. Position the fabric over the bottom hoop, place the top hoop over it, then alternately tighten the screw and gently pull out on the edges of the fabric until you have a tight surface to work on.
Cut a piece of floss about 15 inches (35 cm) long. Look closely at the floss and you’ll see that it is made up of 6 threads twisted together. Gently separate the number of the threads you need and pull them apart from the rest.
Pulling your threads apart can be a good way to really mess up your floss so try these simple techniques to prevent knots: either grasp the strand near the end and pull out one thread at a time, or separate the threads, holding them apart with one hand, then draw your finger downwards between them as you hold the other end of the floss in your other hand.
I usually start with 3 threads for most line work. You can use 2 or even 1 thread for small details, and 4-6 threads for thicker lines or filling in solid areas. If you have various needle sizes, you can use one with a smaller eye for less threads, and a larger eye for more threads.
Now thread your needle!

Threading a needle with several threads can be tricky at first, it helps to snip off the end of the floss straight across, dampen it a little to hold the threads together, hold it very close to the end and then slide the eye of the needle over it. Voila!
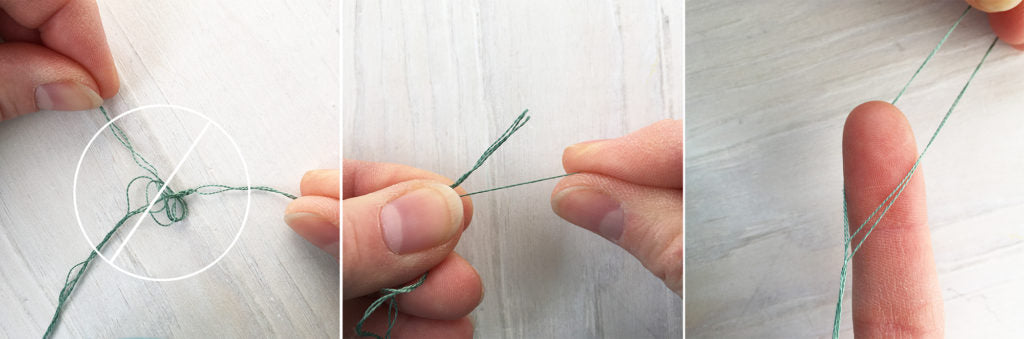
Lastly, tie a knot in one end and pull it up through the fabric from the back. Here's my favorite knotting trick! Try it out, or knot your floss however you like.

1. Wrap the end of your floss around the tip of your finger, just enough to overlap it.
2. Roll your thumb and the floss up over the top of your finger.
3. Grab the roll and pull it downward towards the end of the floss.
4. There's your knot! (sometimes messy, but perfectly functional. ;)
Perfect, you're all ready to embroider! CLICK HERE to learn some easy, basic stitches.
Then, visit the Embroidery DIY tutorials for some easy ways to transfer your digital embroidery pattern to fabric and to learn some easy embroidery stitches.

Also, visit the little dear YouTube channel for video tutorials of lots of basic stitches!
There is so much you can do with embroidery! Come visit the little dear shop and pick out a unique Embroidery Kit (with everything you need in one box!) Pre Printed Fabric Sampler or PDF pattern download to try out your new stitching expertise.


